
Is the BaBylissPRO Style Switch the Only Tool You'll Ever Need?
BaBylissPRO Style Switch: Honest Review & Pro Styling Guide
One handle. Four attachments. We tested it the way only a salon can — then broke down exactly how to get the most from it.
The promise of an all-in-one styling tool is appealing in theory and often disappointing in practice. So when BaBylissPRO — a brand our Tangerine stylists already trusted for professional-grade performance — released the Style Switch, we took it seriously. We tested it in-salon and at home across different hair types, then put together this guide: what it actually does well, where it has limits, and how to get professional results from each attachment.
The short version: the Style Switch comes closer to its "one tool" promise than almost anything else at this price point. For the full breakdown, keep reading.
What Is the BaBylissPRO Style Switch?
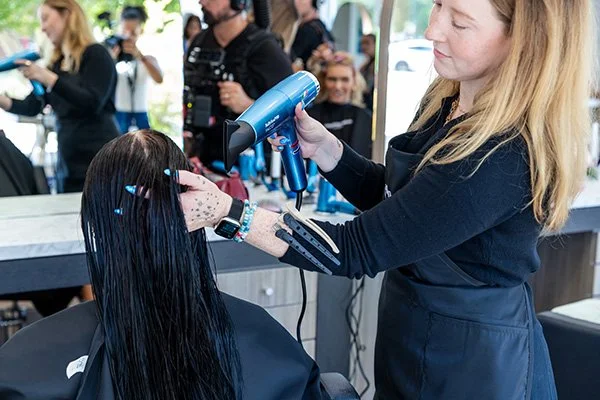
The Style Switch is a modular styling system built around a single motor handle with a quick-release latch. Four attachments snap on and off in seconds: a dryer nozzle, a round brush, a smoothing tool (essentially a mini flat iron), and a diffuser. The concept eliminates the need for multiple separate tools — one motor powers all four functions.
The handle uses BaBylissPRO's Nano Titanium Ionic technology, which generates negative ions to reduce frizz and static. This is the same ionic technology in their professional dryers — not a downgraded consumer version. In North Texas, where humidity is a near-constant styling obstacle, this matters. Ionic tools actively counteract the moisture absorption that causes frizz rather than just smoothing it superficially.
The tool is also dual-voltage and comes with a travel case, making it practical for clients who travel frequently — including the Dallas Cowboys Cheerleaders, who travel extensively during the season and need tools that perform consistently everywhere. Read more about their styling routine in our DCC hair secrets post.
Our Honest Verdict by Category
The motor is genuinely powerful for a multi-tool — airflow is strong enough to rough-dry medium-density hair quickly. It won't replace a high-end standalone dryer for thick, coarse hair, but for fine to medium hair it performs at a professional level.
The boar-and-nylon bristle round brush attachment is the best performing head. It creates a smooth, voluminous blowout that genuinely rivals what you'd achieve with a separate dryer and round brush — the combination of heat and tension is well-calibrated.
Works well for light smoothing and frizz control, but plate temperature is lower than a dedicated flat iron. For guests with thick, coarse, or very curly hair who want a truly straight result, a separate flat iron will outperform it. For fine to medium hair needing polish, it's excellent.
The diffuser works as expected for enhancing natural curl patterns and reducing frizz during drying. Airflow can be strong on high settings — use low to medium speed for curl definition. Wavy hair benefits most; very tight coils may prefer a more bowl-style diffuser.
A small feature that changes how you use the tool. The pause button stops airflow and heat instantly without powering down — allowing you to switch attachments, re-section hair, or adjust your grip mid-styling without the tool cooling down or losing momentum.
The Style Switch performs at its best on fine to medium density hair. Thick, very coarse, or highly textured hair may find the dryer motor insufficient for rough-drying and the smoothing tool underpowered. Know your hair type before investing — see our hair texture guide.
Each Attachment, In Depth

The round brush attachment creates a voluminous blowout that rivals a separate dryer-and-brush setup — the Style Switch's strongest performer
Pro Blowout Technique: Step by Step
The most common reason a home blowout underperforms a salon blowout isn't the tool — it's the process. Here's exactly how Tangerine stylists approach a blowout with the Style Switch.
Aveda Damage Remedy Daily Hair Repair applied to towel-dried hair before any heat is non-negotiable — both for protecting the hair's integrity and for extending your color between appointments. Work it through mid-lengths to ends, avoiding the scalp.
Attach the dryer nozzle and rough-dry your entire head until hair is mostly dry but still slightly damp. Work in the direction of the cuticle (root to tip) to smooth rather than roughen the hair surface. This step determines how smooth your final result will be — don't skip it or rush it.
Clip hair into sections: two at the nape, two above. Working in sections is what separates a salon blowout from a home blowout — it ensures even tension and full heat contact on every piece of hair. Start from the bottom sections and work upward.
Use the pause button to switch attachments without cooling down. Take a subsection no wider than the brush barrel, place the brush at the root, and roll it down through the length with moderate tension while directing airflow from the handle. Lift slightly at the root before rolling for volume.
After each section is smooth and dry, use the cold shot button to set the style. Cold air locks the cuticle flat and holds the shape the heat created. This is the step most home stylists skip — and the one most responsible for a blowout losing its shape by afternoon.
A small amount of Aveda Dry Remedy Moisturizing Oil worked through dry ends adds the final mirror-like shine and seals the cuticle. For color-treated hair, this also helps lock in your toner or gloss result between salon visits. Use sparingly — a little goes a long way on a smooth blowout.
Protecting Your Hair When Using Heat Tools
Regular heat styling — even with a well-designed ionic tool — accumulates stress on the hair over time. The guests at Tangerine who maintain the healthiest hair while styling frequently share a few common practices.
Always use heat protectant
This isn't optional. A thermal protectant applied before heat styling reduces the structural damage that accumulates with regular use. Aveda Damage Remedy Daily Hair Repair is our consistent recommendation — it provides thermal protection without adding weight or affecting how the style sets.
Match heat to hair type
Fine and color-treated hair needs lower heat settings. The Style Switch's smoothing tool actually has an advantage here — its maximum temperature is gentler than a professional flat iron, which is the right call for fragile strands. If your hair porosity is high (common after bleaching or heavy color work), keep heat settings lower and prioritize the ionic drying function over direct heat plates.
Build in no-heat days
The best routine includes days where hair air-dries completely. The diffuser attachment is useful here — it significantly reduces drying time while adding far less thermal stress than any direct-heat tool. For guests in active color maintenance, alternating heat and no-heat days is one of the simplest ways to extend color vibrancy between appointments. Our full Aveda product guide covers at-home care in depth.
Heat styling affects color longevity as directly as washing frequency does. High heat without protection causes the cuticle to lift — which accelerates color fade and toner loss. The ionic technology in the Style Switch helps counteract this by keeping the cuticle flatter during styling, which means color lasts longer between salon visits.
For guests maintaining balayage, vivid color, or a specific toner result, investing in quality ionic tools and using them correctly is part of the color maintenance protocol — as important as the products you use at home. Our color consultation guide covers what to discuss with your colorist before your next appointment.
Get a Professional Blowout at Tangerine
Blowouts, styling services & expert product advice at all five DFW locationsBook a Blowout. Leave Looking Salon-Fresh.
Whether you want to master the Style Switch at home or just want a professional blowout, Tangerine's stylists are ready at five DFW locations.
Book Your Appointment